How to Add a Virtual Environment to Jupyter Notebook or Jupyter Lab?
Jupyter Notebook uses the IPython kernel developed for jupyter. If we want to add the virtual environment we created on our computer to the Jupyter notebook, we need to do extra operations for this.
First we need to activate our virtual environment.
conda activate <my_env_name>
Then we need to install the ipykernel package in our virtual environment.
pip install --user ipykernel
In the last step, we add the virtual environment by writing the following code on command terminal.
python -m ipykernel install --user --name=<my_env_name>
Example: We add our virtual environment named aws to Jupyter .
conda activate aws
pip install --user ipykernel
python -m ipykernel install --user --name = aws
When we run the above codes, aws virtual environment is added to Jupyter.
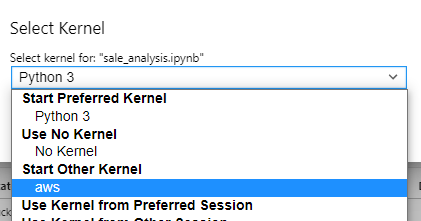
To activate env. we open the Jupyter Lab. Then we click the Python 3 button on the upper right corner. The screen where we can select the kernel will open.

I selected the aws virtual environment from the drop down-box shown like in the picture below.
We see from the upper right corner that Jupyter’s kernel has changed after the selection is made.

Good Luck.